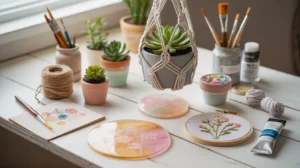
10 DIY Photo Embroidery Ideas That Turn Your Favorite Memories into Wall Art
If you’ve been sitting on a phone full of photos doing absolutely nothing except taking up storage — this is your sign. DIY photo embroidery ideas are the most charming way to turn your favorite snapshots into heirloom-worthy wall art.
We’re talking thread, fabric, and a little patience that pays off in the most satisfying, textured, handmade way possible. Studies even show that crafting reduces stress — no wonder half of Pinterest looks so blissfully happy ✂️.
These projects are affordable, personal, and wildly impressive. Whether you’re a total beginner or a seasoned stitcher, there’s something here for every skill level. Best part? Almost every supply on this list is shoppable online. So grab your bamboo hoop and let’s get to it.
Contents
- 1 What are the best DIY photo embroidery ideas for beginners?
- 2 What is the stick and stitch embroidery technique?
- 3 Why Photo Embroidery Is the Craft Trend You Didn’t Know You Needed
- 4 10 DIY Photo Embroidery Ideas to Try Right Now
- 4.1 1. Stick and Stitch Portrait Embroidery Hoop
- 4.2 3 Pieces Embroidery Hoops, 8 inch Bamboo Frame Circle Cross Stitc…
- 4.3 24 Skeins Multicolor Embroidery Floss Six Strand Embroidery Cross…
- 4.4 FURWEY 12PCS Printable Water Soluble Embroidery Stabilizer 8.5″x1…
- 4.5 2. Custom Pet Portrait Embroidery
- 4.6 3. Black & White Photo with Colorful Embroidery Overlay
- 4.7 Westcott 4″ Embroidery Scissors with Curved Titanium-Bonded Blade…
- 4.8 FIVEIZERO 30-Count Steel Needles for Hand Sewing, 6 Sizes Large E…
- 4.9 PPD Printable Fabric Sheets, Canvas Paper for Inkjet Printer, 8.5…
- 4.10 4. Wedding Photo Embroidery Keepsake
- 4.11 5. Baby Milestone Photo Embroidery Hoop
- 4.12 6. Thread Painting from a Landscape or Travel Photo
- 4.13 7. Photo Embroidery on Denim or a Tote Bag
- 4.14 Caydo 6 Pieces Embroidery Hoops and 15 Needles, Plastic Circle Cr…
- 4.15 Omoone Women’s Oversized Mid Long Denim Jacket Jean Biker Coat
- 4.16 The Original 108-Color Embroidery Floss Kit – 99 Cotton & 9 Metal…
- 4.17 8. Family Portrait Embroidery Art — The Group Hug on Fabric
- 4.18 9. Memorial Embroidery from Photos — Stitch Someone You Love
- 4.19 Athena’s Elements Embroidery Floss | Rainbow Thread for Embroider…
- 4.20 Pllieay 12 Pieces 8 Inch Round Embroidery Hoops Bamboo Circle Cro…
- 4.21 HOTGODEN Medium Weight 100% Cotton Muslin Fabric: 59 inch x 2 Yar…
- 4.22 10. Minimalist Embroidery Portrait with Simple Line Stitching
- 5 Ready to Stitch Your Memories?
- 6 Frequently Asked Questions
What are the best DIY photo embroidery ideas for beginners?
The easiest entry points are stick and stitch embroidery patterns and minimalist photo overlay stitching. Both require only basic running stitch or backstitch, and the water-soluble stabilizer does most of the heavy lifting. A simple photo embroidery kit from Amazon is all you need to get started.
What is the stick and stitch embroidery technique?
Stick and stitch uses a water-soluble stabilizer sheet onto which your image is printed. You stick it to fabric, stitch right over the design, then rinse the stabilizer away with cold water to reveal a clean embroidered piece. It’s the most beginner-friendly photo transfer embroidery technique available.
Why Photo Embroidery Is the Craft Trend You Didn’t Know You Needed
They say idle hands are the devil’s workshop — but with a needle and floss, they’re pure magic. Photo embroidery sits at the sweet spot between photography and fiber art. It takes something digital and makes it deeply, touchably real. When you stitch over a printed image of your grandmother, your dog, or your wedding day, you’re not just making decor — you’re creating a sensory memory. If you’re new to the world of handmade creativity, our guide to Relaxing Arts and Crafts for Adults is the perfect warm-up before you pick up a needle.
The technique has exploded in popularity because it’s genuinely accessible. You don’t need an art degree or a fancy studio. You need a photo, some basic supplies, and a cozy afternoon. Whether you go full thread-painting or keep it minimal with just a few accent stitches, the result always feels intentional, warm, and one-of-a-kind. That’s the quiet superpower of handmade.
10 DIY Photo Embroidery Ideas to Try Right Now
⚠️ Warning: After this list, you may start hoarding printed photos, bamboo hoops, and embroidery floss in suspicious quantities.
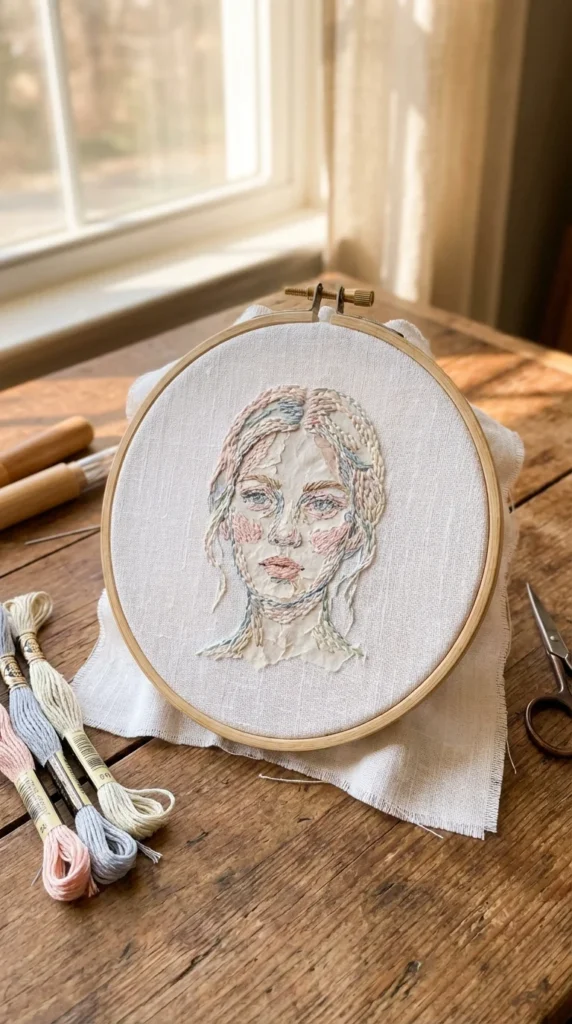
1. Stick and Stitch Portrait Embroidery Hoop
This is the one that started it all for most photo embroidery beginners — and for good reason. Stick and stitch embroidery patterns use a water-soluble stabilizer printed with your image. You iron it onto fabric, stitch right over it, then rinse away the paper to reveal a clean, gorgeous thread portrait. The result looks impossibly professional, feels incredibly personal, and takes just a few hours. Think of it as paint-by-numbers, but make it textile.
What You’ll Need:
- Water-soluble stabilizer sheets (printable)
- Inkjet printer
- Embroidery floss in skin, hair, or nature tones
- Bamboo embroidery hoop (6″ or 8″)
- Embroidery needle and small scissors
How to Make: Print your photo onto the stabilizer sheet. Iron it onto a piece of white or cream cotton fabric stretched in your hoop. Begin stitching over the printed lines using satin stitch or backstitch for outlines. Once finished, submerge in cold water to dissolve the stabilizer. Allow to dry, re-hoop, and frame!
🛒 Pro Tip: Look for water-soluble stabilizer embroidery sheets on Amazon — packs of 20+ sheets give you enough to experiment and perfect your technique. Grab a beginner embroidery floss set in 50+ colors while you’re at it. And once your hoop art is ready to display, check out these gorgeous Living Room Accent Wall Ideas for the perfect backdrop to show it off.
Time Needed: Approx. 3–5 hours | Difficulty: Easy ⭐


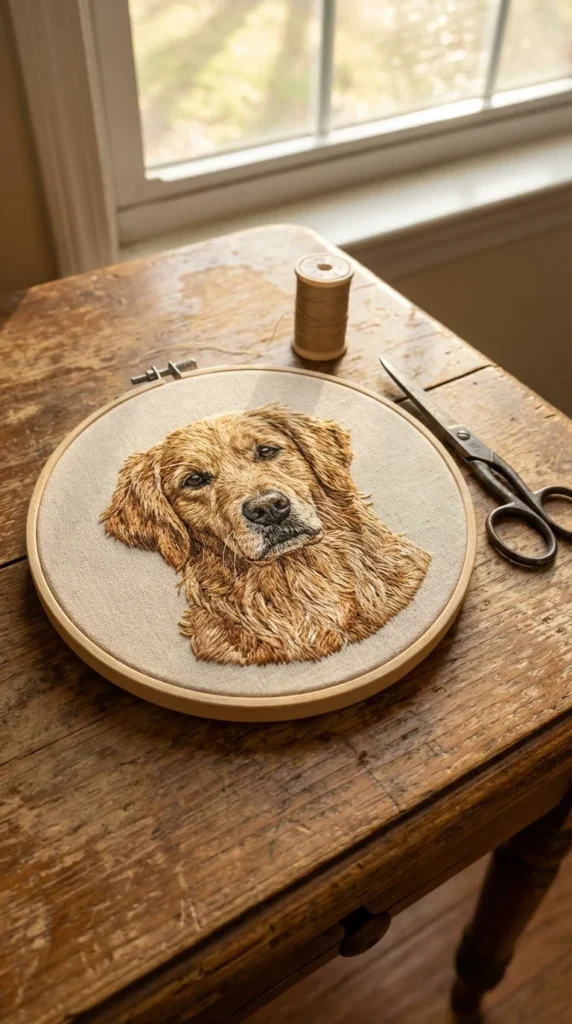
2. Custom Pet Portrait Embroidery
Because your fur baby absolutely deserves to be immortalized in thread. Custom pet photo embroidery is one of the most popular DIY photo embroidery ideas right now — and it makes the most heartfelt handmade gift imaginable. If you’re making this as a present, you’ll find even more creative inspiration in our roundup of Unique Gift Ideas for Photographers — perfect for the photo-loving pet parent in your life. Print your pet’s photo, use a custom embroidery pattern from photo services on Etsy, and stitch your fluffy little chaos agent into textile legend.
What You’ll Need:
- Digital pet photo (high contrast works best)
- Custom embroidery pattern from photo (Etsy digital download)
- Pre-printed embroidery fabric or plain cotton
- Embroidery floss matched to your pet’s coloring
- 10″ bamboo embroidery hoop
How to Make: Order or download a custom pattern made from your pet’s photo. Print it onto iron-on transfer paper or stabilizer fabric. Hoop your fabric, transfer the image, and begin stitching outlines in backstitch. Fill in fur with long-and-short stitch for a realistic texture. Add a pop of color to the background for that boho embroidery hoop decor vibe.
🛒 Pro Tip: Etsy sellers offer custom embroidery pattern from photo services starting at just a few dollars — they convert your pet photo into a stitchable line drawing. Search “custom pet embroidery pattern digital download” for dozens of options.
Time Needed: Approx. 4–6 hours | Difficulty: Moderate ⭐⭐
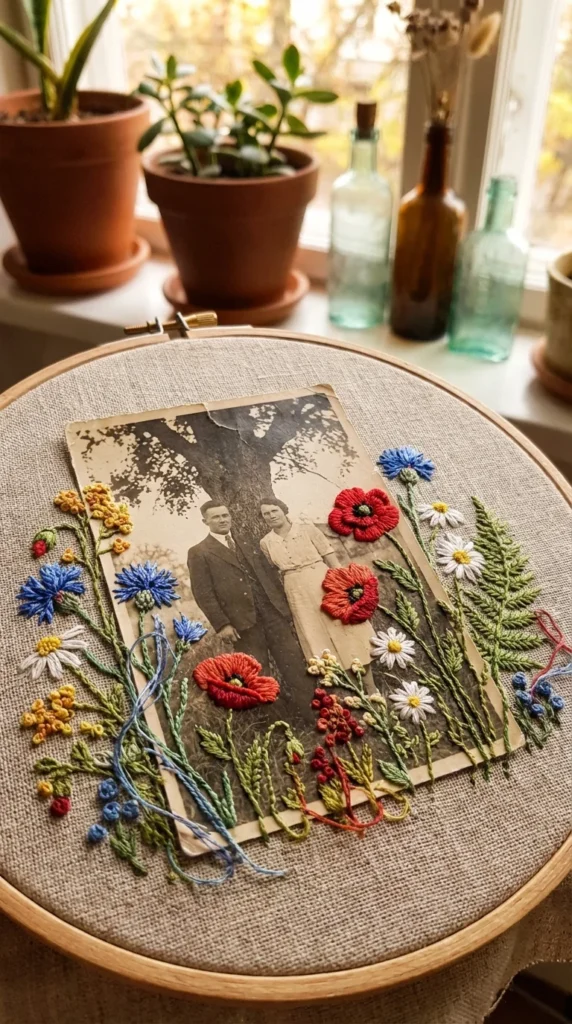
3. Black & White Photo with Colorful Embroidery Overlay
This one is pure artistic magic ✨. You print an old black-and-white photo directly onto fabric, then add colorful embroidery stitches on top — flowers blooming from a grandmother’s hair, butterflies resting on shoulders, or botanical vines framing a childhood portrait. The contrast of monochrome photography and vibrant thread is absolutely stunning and deeply personal.
What You’ll Need:
- B&W photo printed on printable cotton fabric sheets
- Embroidery floss in bright or pastel shades
- Embroidery hoop (sized to your photo)
- Embroidery needle, small scissors, stabilizer
How to Make: Print your black-and-white photo onto a printable fabric sheet. Let it dry fully, then back it with plain cotton and hoop it. Begin adding embroidery elements around and over the photo — flowers, stars, leaves, or geometric lines. Keep stitches loose and decorative rather than filling everything in.
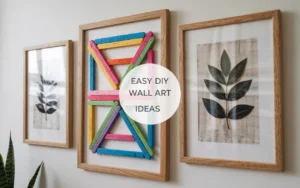
Frame the finished hoop as modern embroidery hoop wall art. Need more budget-friendly ways to fill your walls with handmade charm? DIY Wall Art Ideas is packed with creative projects that sit beautifully alongside your embroidery hoops.
🛒 Pro Tip: Printable cotton fabric sheets for inkjet printers make hand embroidery on printed photos so much easier. Look for packs on Amazon or Etsy — they wash clean without fading.
Time Needed: Approx. 2–3 hours | Difficulty: Easy ⭐


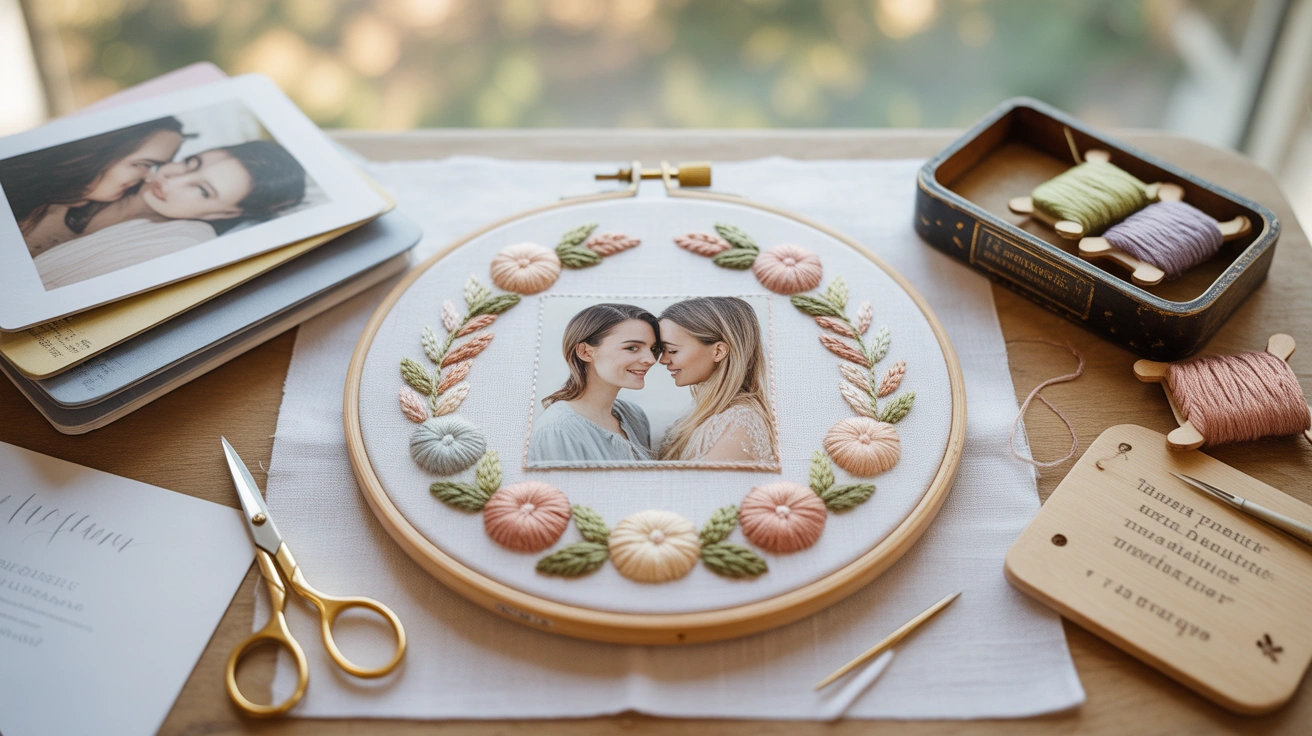
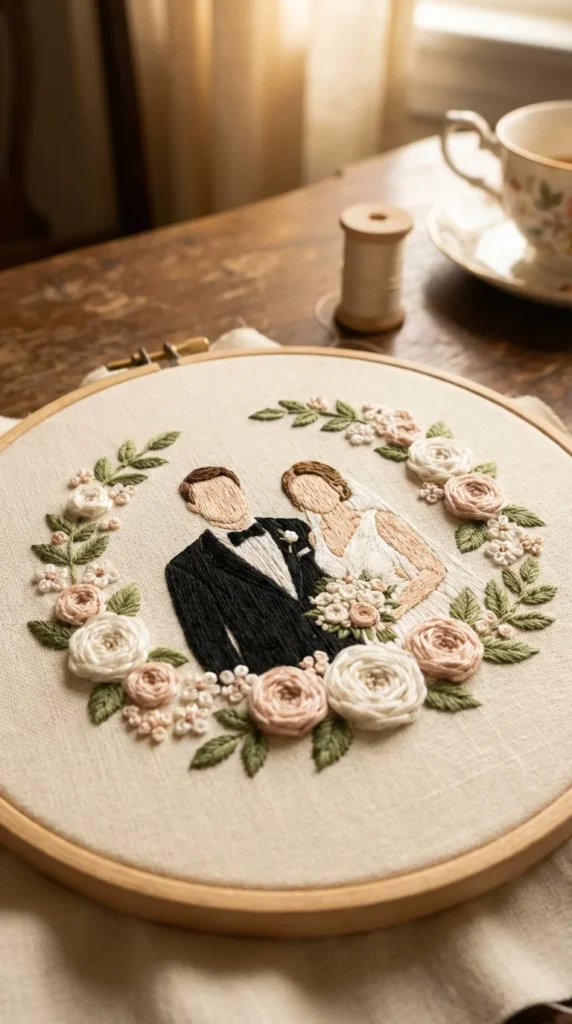
4. Wedding Photo Embroidery Keepsake
Something old, something new, something stitched, something blue 💍. A wedding photo embroidery keepsake is hands-down one of the most sentimental gifts you can make — for a newlywed couple, an anniversary, or even yourself.
Planning the full celebration too? Our Wedding Shower Decorating Ideas are full of handmade-aesthetic inspo that pairs beautifully with an embroidered hoop as a centerpiece or party favor. Stitch a favorite wedding portrait into a hoop, add the date in backstitch below, and surround it with delicate white and cream florals. It’s the kind of gift that makes people actually cry.
What You’ll Need:
- High-resolution wedding photo
- Photo transfer embroidery technique supplies (stabilizer or iron-on)
- White, cream, blush, and gold embroidery floss
- 8″ or 10″ natural bamboo embroidery hoop
- Fine embroidery needle
How to Make: Transfer your wedding photo using the stick and stitch or iron-on method. Stitch the couple’s outlines and facial features in neutral thread tones. Add a wreath of French knot flowers and lazy daisy leaves around the image edge. Backstitch the wedding date in elegant script at the bottom. Finish the hoop back neatly and display or gift in a shadow box.
🛒 Pro Tip: Amazon has beautiful embroidery floss sets with metallic gold thread perfect for wedding projects. For a professional photo transfer without mess, try pre-printed embroidery fabric from specialty Etsy shops — they print your photo directly onto stitchable material.
Time Needed: Approx. 5–8 hours | Difficulty: Moderate ⭐⭐
5. Baby Milestone Photo Embroidery Hoop
First smile. First steps. First time sleeping through the night (legendary). Baby milestone photos are some of the most cherished captures of parenthood — and turning one into a baby photo embroidery hoop makes for the sweetest nursery decor or first birthday gift. Go with soft pastels, tiny star clusters, and a name stitched in cursive for the full “melting hearts” effect.
What You’ll Need:
- Baby milestone photo (printed on stabilizer or fabric)
- Soft pastel embroidery floss — mint, blush, butter yellow, lavender
- 6″ bamboo embroidery hoop
- White cotton muslin fabric
- Iron-on letters or backstitch for the name
How to Make: Print the baby photo using a water-soluble stabilizer method. Center it in the hoop on white muslin. Embroider delicate accents — stars, moons, clouds, or tiny hearts — around the photo. Add the baby’s name in small cursive backstitch below the image. Finish the back of the hoop cleanly with a hot glue edge for a ready-to-hang piece. Gifting this at a celebration? Browse these fresh Summer Baby Shower Themes to style the whole event around a handmade, heartfelt aesthetic.

🛒 Pro Tip: A beginner photo embroidery kit from Amazon with pre-selected pastel threads, a hoop, needles, and instructions is a perfect starting point for new parents or gift-givers who are brand new to stitching.
Time Needed: Approx. 2–4 hours | Difficulty: Easy ⭐


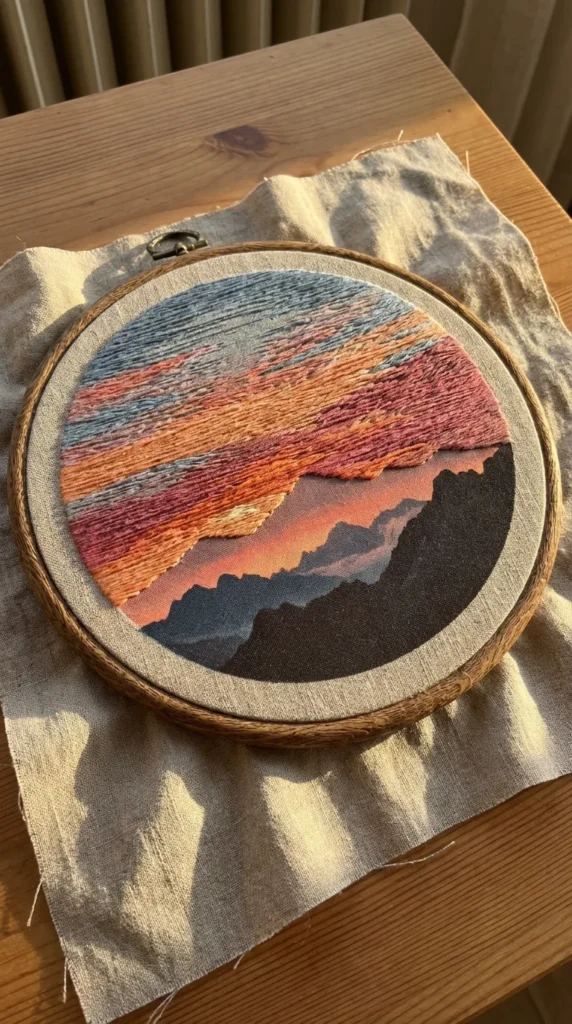
6. Thread Painting from a Landscape or Travel Photo
If you’ve ever wanted to turn a sunset photo from your Santorini trip into something you can actually hang on your wall — thread painting is your answer. This technique involves filling in a printed photo outline with layered embroidery stitches, blending colors to mimic the look of a painting. The result is a breathtaking piece of fiber art that doubles as a travel memory. Major brag-worthy wall decor.
What You’ll Need:
- High-contrast landscape photo
- Custom embroidery pattern from photo (simplified line drawing version)
- Large embroidery floss set in gradient sky, earth, and water tones
- 12″ bamboo embroidery hoop or stretcher frame
- Sharp embroidery scissors
How to Make: Convert your photo to a simplified line drawing using an online tool or Etsy pattern service. Transfer it to fabric. Begin stitching from the background to the foreground using long-and-short stitches to blend color transitions — just like painting. Use darker shades for shadows, lighter for highlights. Frame in a large hoop or have it professionally stretched.
🛒 Pro Tip: Look for thread painting from photos starter kits on Etsy — they come with a pre-printed pattern based on your chosen image and color-coded DMC floss suggestions, making this advanced technique genuinely beginner-approachable.
Time Needed: Approx. 8–15 hours | Difficulty: Advanced ⭐⭐⭐
7. Photo Embroidery on Denim or a Tote Bag
Why hang your memories on the wall when you can wear them? Photo embroidery on denim jackets or canvas tote bags is one of the coolest wearable-art trends right now. Use a stick and stitch approach to transfer a small photo — your pet, a favorite quote portrait, a travel snapshot — onto the back of a jacket or the front pocket of a tote. Equal parts fashion and sentimental.
What You’ll Need:
- Denim jacket, jeans, or canvas tote bag
- Stick and stitch water-soluble stabilizer sheet
- Embroidery floss in your chosen palette
- Embroidery needle (denim needle for thick fabric)
- Small embroidery hoop to hold fabric taut
How to Make: Print your photo (simplified or outline version) onto a water-soluble stabilizer sheet. Stick it onto your denim or canvas surface. Hoop the area tightly. Stitch over the design using backstitch for outlines and satin stitch for fills. Rinse away the stabilizer under cold water and allow to air dry completely. Wear it everywhere — and if you’re styling your embroidered denim into a full look, our Spring 2026 Fashion Trends has all the outfit ideas that pair effortlessly with handmade wearable art.

🛒 Pro Tip: Grab a denim embroidery needle set on Amazon — specifically designed for thick fabric and prevents frustrating breakage. Pair with a water-soluble stabilizer pack and you’re set for multiple wearable projects.
Eco Note: Perfect for upcycling an old denim jacket that’s been sitting in your wardrobe for three years. For more eco-conscious craft ideas, Recycled Christmas Crafts proves that sustainable and stunning go beautifully hand in hand.
Time Needed: Approx. 2–3 hours | Difficulty: Moderate ⭐⭐


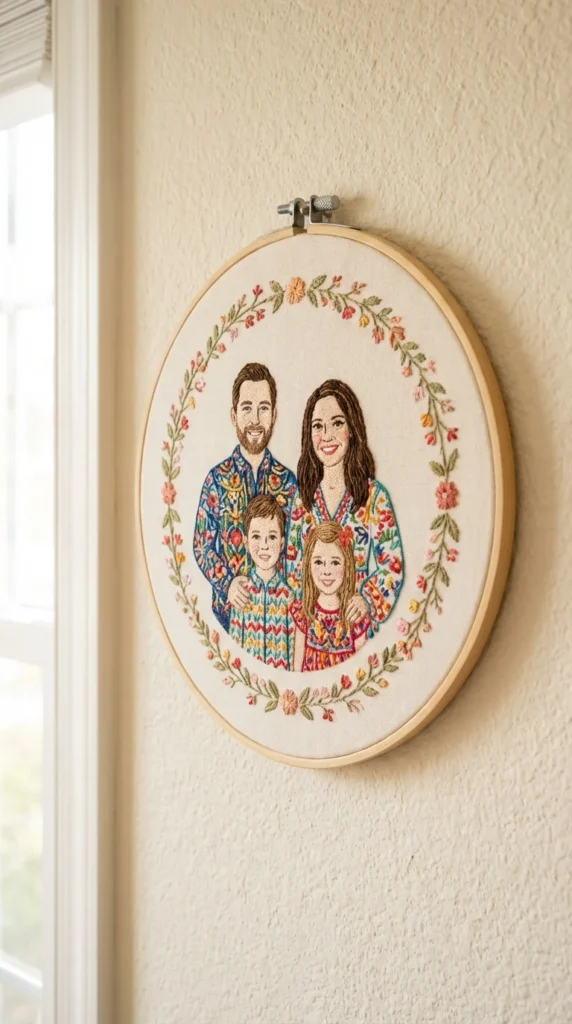
8. Family Portrait Embroidery Art — The Group Hug on Fabric
If personalized gifts were a sport, family portrait embroidery art would be the gold medal event. Choose a beloved group photo — holiday portrait, reunion snapshot, candid beach moment — and stitch it into a keepsake hoop that everyone will genuinely fight over. This is the kind of handmade gift that gets framed, shown off, and talked about for years. IMO, nothing beats it. If you’re gifting it at a milestone celebration, our Unforgettable 30th Birthday Party Ideas has décor inspiration that complements handmade keepsakes beautifully.
What You’ll Need:
- Group family photo (clear faces, good lighting)
- Custom embroidery pattern from photo (Etsy pattern maker service)
- Embroidery floss in skin, hair, and clothing tones
- Large bamboo embroidery hoop (10″–14″)
- Pre-printed embroidery fabric with photo
How to Make: Commission a custom line-drawing pattern of your family photo from an Etsy seller. Transfer it to fabric using your preferred method. Stitch each person’s outline and clothing in matching floss colors. Add a simple background — a stitched sky, grass, or abstract color fill. Personalize with names or a date stitched in the lower margin. Frame or gift in a natural wood hoop.
🛒 Pro Tip: Several Etsy shops offer pre-printed embroidery fabric with your photo already applied — they literally print your family portrait onto stitchable cotton so you can start the moment it arrives. Search “custom photo embroidery fabric print” on Etsy.
Time Needed: Approx. 6–10 hours | Difficulty: Moderate ⭐⭐
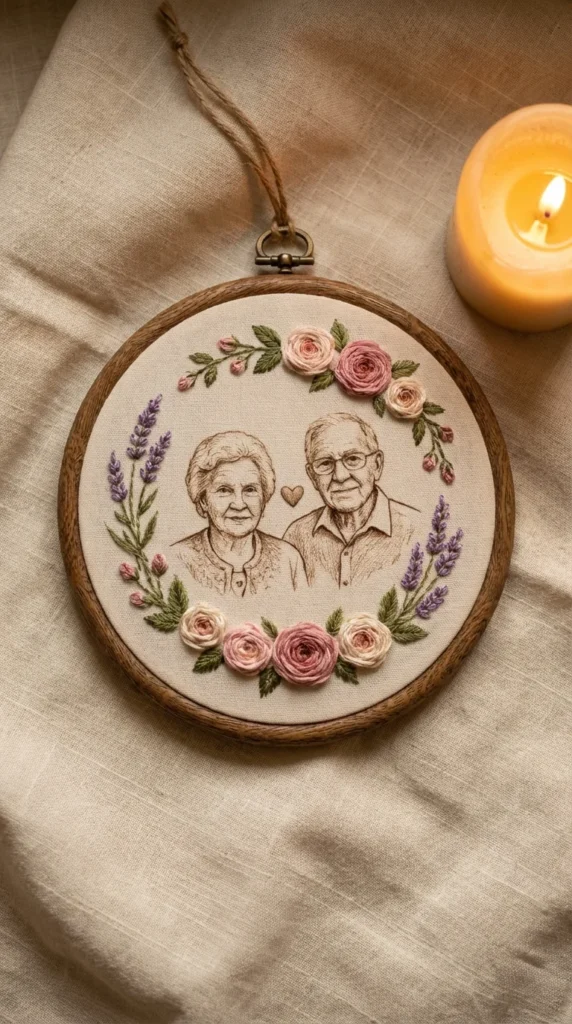
9. Memorial Embroidery from Photos — Stitch Someone You Love
Some photos deserve more than a digital frame. A memorial embroidery from photos is a deeply meaningful way to honor someone who has passed — a grandparent, a beloved pet, a dear friend. Create a stitched portrait, frame it in a warm wood hoop, and surround it with flowers they loved or symbols that remind you of them.
It’s grief, made beautiful and tangible. For more thoughtful, hands-on projects that bring comfort and creativity together, our Relaxing Arts and Crafts for Adults offers a whole collection of mindful making ideas that pair perfectly with a healing creative practice.
What You’ll Need:
- A meaningful photo of the person or pet
- Stick and stitch or photo transfer embroidery supplies
- Embroidery floss in soft, meaningful colors
- 8″–10″ bamboo embroidery hoop
- Linen or muslin fabric backing
How to Make: Choose a clear, well-lit photo. Transfer using the stabilizer method. Stitch the portrait gently, taking your time with facial features using tiny split stitches. Add meaningful embellishments — roses for love, lavender for remembrance, butterflies for transformation. Finish with a name or meaningful date in simple backstitch. This is a project made with love, so take all the time you need.
🛒 Pro Tip: For the most accurate likeness, order a custom embroidery pattern from photo on Etsy — several artists specialize in memorial portrait patterns with gentle, stitchable line drawings.
Time Needed: Approx. 4–8 hours | Difficulty: Moderate ⭐⭐


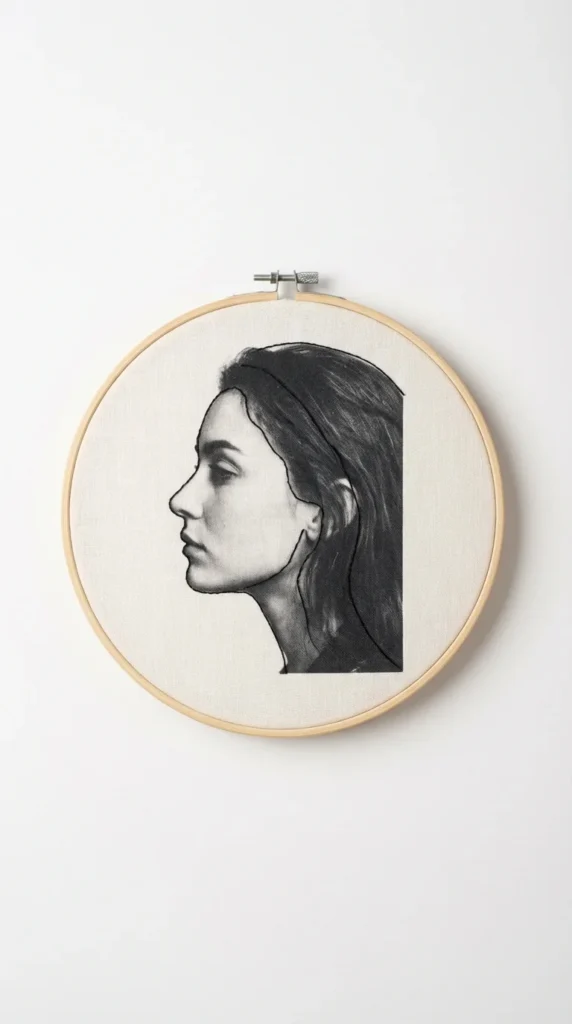
10. Minimalist Embroidery Portrait with Simple Line Stitching
Not every photo embroidery project needs to be a full stitch-painting marathon. This minimalist embroidery portrait approach strips it back beautifully — just a printed photo with a few strategic embroidery accents. A thin outline around a silhouette, tiny stars scattered across a sky, or a single thread color tracing the curve of a face.
Less is more, and in this case, less is also absolutely stunning. Once your minimalist hoop is finished and framed, Cozy Small Bedroom Decor Ideas will show you exactly how to style it into a gallery wall that feels personal and Pinterest-perfect.
What You’ll Need:
- Photo printed on printable fabric or stabilizer
- 1–3 colors of embroidery floss (monochrome is stunning)
- 6″ bamboo embroidery hoop
- Basic backstitch or running stitch skills only
How to Make: Print your photo onto fabric. Choose one or two areas to accentuate — the outline of a face, the edge of a garden, the arc of a horizon. Using just backstitch or running stitch, trace those elements in thread. Leave the rest of the photo as-is. The contrast between photographic detail and hand-drawn stitch creates a dreamy, gallery-worthy minimalist effect.
🛒 Pro Tip: For this simple approach, a basic embroidery hoop art beginner kit with a handful of thread colors, a needle set, and a small hoop is all you need — under $15 on Amazon and endlessly reusable.
Time Needed: Approx. 1–2 hours | Difficulty: Easy ⭐
Ready to Stitch Your Memories?
There you have it — 10 DIY photo embroidery ideas that prove your favorite photos deserve way more than a phone screen or a photo book collecting dust on a shelf. Whether you start with a simple minimalist portrait or dive straight into a full thread-painted landscape, you’re going to love the process just as much as the result.
Grab your bamboo hoop, queue up your favorite playlist, and pick one photo that’s been waiting to become something extraordinary. Share your finished projects — because creativity looks seriously good on you. Happy stitching! 🎨
Frequently Asked Questions
Where can I buy a photo embroidery kit online?
Amazon, Etsy, and craft retailers like JOANN all carry photo embroidery kits. On Etsy, search “custom embroidery pattern from photo” for personalized digital downloads, or “stick and stitch photo embroidery kit” for ready-to-ship physical kits with everything included.
Can I do photo embroidery without any prior stitching experience?
Absolutely! Ideas 1, 3, and 10 on this list are specifically designed for complete beginners. With a beginner photo embroidery tutorial guide and a starter kit, most people create something beautiful on their very first project. Start with simple backstitch — it’s the gateway stitch to everything.
What makes photo embroidery such a good handmade gift idea?
Photo embroidery gifts are personal, time-invested, and completely one-of-a-kind — which is exactly why they resonate so deeply. Whether it’s a pet portrait embroidery DIY, a wedding photo embroidery keepsake, or a memorial embroidery from photos, the recipient knows immediately that real love went into making it. No algorithm can replicate that.